FAQs
These are some Frequently Asked Questions (FAQs) on the Jasmine OpenSSD Platform. This document conforms to the Jasmine firmware version 1.0.4 released on May 12, 2011.
Getting started
What is included in the Jasmine OpenSSD Platform?
The Jasmine OpenSSD platform package is distributed with the following components:
- The Jasmine board with two 32GB flash modules installed (total capacity: 64GB)
- A SATA interface cable
- A serial cable
All the technical documents and the necessary software will be available in the OpenSSD project homepage.
How can I attach the Jasmine board to my computer?
You can attach the Jasmine board as if it were a normal SATA drive. Connect the SATA-compatible power adapter cable and the SATA interface cable to the Jasmine board.
What happens when I attach the Jasmine board to my computer?
The Jasmine board is initially shipped with an Indilinx’s full-fledged proprietary firmware. The firmware is actually the same as the one used in commercial SSDs based on the Indilinx’s BarefootTM controller. Therefore, the operating system will recognize your Jasmine board as a normal 64GB SSD.
Working in the factory mode
What is the factory mode?
The factory mode is a mode of operation where you can backup/restore the bad block information of your flash chips and download the firmware binary.
How can I boot the Jasmine board in the factory mode?
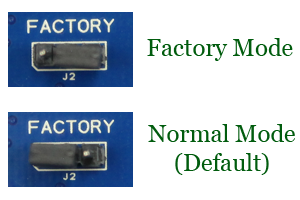 Whether or not the Jasmine board is put into the factory mode is determined by the on-board jumper switch J2 titled “FACTORY.” Unfortunately, the current version of the Jasmine board does not indicate which position is for the factory mode. (Yes, this is a mistake and it will be fixed in the next version.) Facing the text “FACTORY”, if you cover right two pins of J2 with a jumper cap, the Jasmine board is put into the factory mode. Otherwise (i.e., if left two pins are shorted by a jumper cap), it will be booted in the normal mode (see the right figure).
How can I return to the normal (non-factory) mode?
Shutdown your computer, put the jumper cap in J2 to the normal mode position (i.e., covering left two pins), and restart your computer. It’s as simple as that. ;-) If your SATA controller supports hot swapping, you can just flip the on-board power switch SW1.
How do I know if the Jasmine board has been booted in the factory mode?
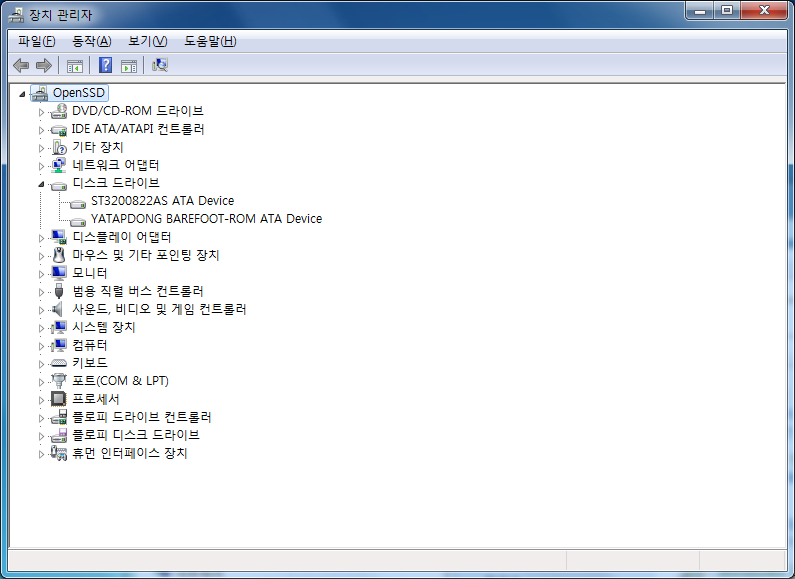
If you are successful in booting the Jasmine board in the factory mode, the Window’s Device Manager will list your device as “YATAPDONG BAREFOOT-ROM ATA Device” as shown in the following figure.
Another way to detect whether the Jasmine board is in the factory mode is to run the installer program (install.exe) bundled with the Jasmine source code distribution. The installer program only works when the Jasmine board is booted in the factory mode. If you execute install.exe under the normal mode, it terminates displaying the error message “ERROR: Jasmine not found”.
What is the installer program (install.exe) for?
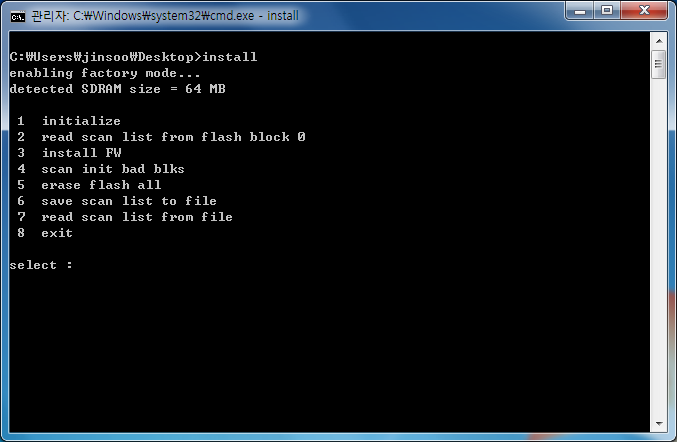
The installer is a basic management tool for the Jasmine board. You can backup/restore the bad block information of your flash chips with install.exe. A new firmware also can be downloaded to the Jasmine board using install.exe. The following figure shows the menu displayed when you execute install.exe from the command line:
Note: The first thing you have to do is to save the initial bad block information to files for each Jasmine board. Once you lose this information, it is very hard to recover.
How can I save the initial bad block information to files?
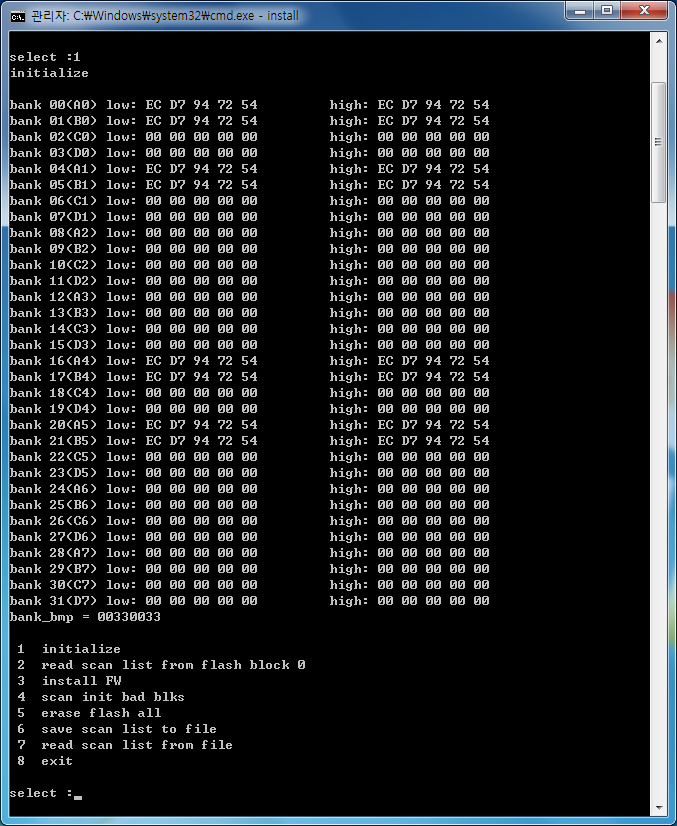
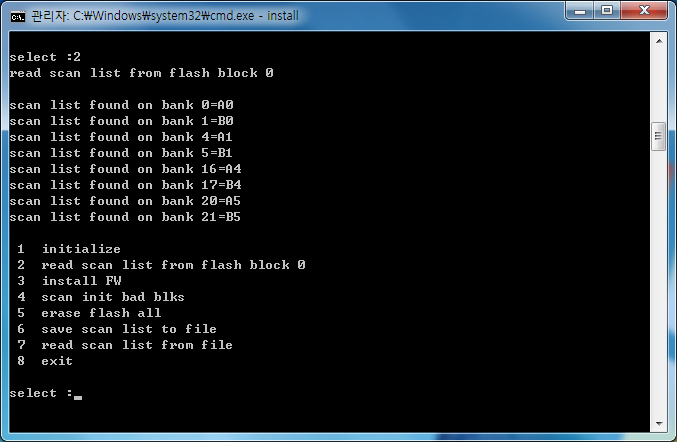
The initial bad block information (called “scan list”) is already recorded in the predefined location of the block 0 in your Jasmine board. Set your Jasmine board to the factory mode and execute the installer. First, select the menu #1 (“initialize”) to make the installer identify the location and type of each flash memory chip attached to the Jasmine board. When successful, the output similar to the following figure will be displayed.
Second, now choose the menu #2 (“read scan list from flash block 0”) to read the initial bad block information from the flash block 0.
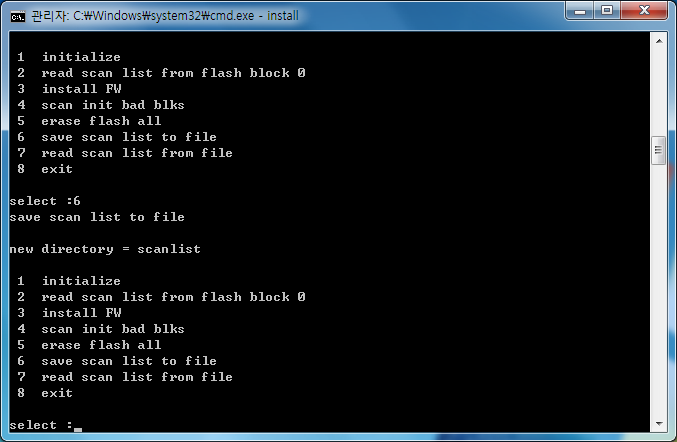
Finally, store the initial bad block information to files by selecting the menu #6 (“save scan list to file”). You will be asked to specify the directory name. For example, if you give the directory name scanlist as in the following figure, the initial bad block information will be stored as files under the directory .\scanlist.
Now you’ve successfully saved the initial bad block information. Keep those files safely.
Is the source code of the installer available?
The full source code of install.exe is available in the .\installer directory in the Jasmine source code distribution. The installer has been built and tested with the Microsoft Visual Studio 2005 and Microsoft Visual C++ 2010 Express Edition. In order to build the installer, double click installer.sln and build it. Note that the Microsoft Visual C++ 2010 Express Edition can be downloaded from Microsoft for free.
Building and installing firmware
Where can I obtain the latest firmware source code for the Jasmine platform?
The latest firmware source code can be download from the Github respository at https://github.com/openssd/jasmine.
What is included in the firmware source code?
The Jasmine source code distribution contains the full source code for initializing the Jasmine board, handling the SATA interface, firmware installer (install.exe), header files, and build scripts. It also includes the source codes of three working FTLs: TutorialFTL, GreedyFTL, and DummyFTL.
What is the TutorialFTL?
The TutorialFTL is a sample FTL developed by Indilinx to demonstrate the basic skeleton of FTL for the Jasmine board. The TutorialFTL has several restrictions:
- It is a page-mapping FTL, but no garbage collection is performed. It simply stops working when there is no more free blocks.
- The entire flash memory is erased whenever the Jasmine board is powered on.
- The mapping information is volatile, as it is maintained in DRAM only.
- Initial bad blocks are taken care of, but run-time bad blocks are not.
What is the GreedyFTL?
The GreedyFTL is another sample FTL developed by Sang-Pil Lim from VLDB Laboratory at Sungkyunkwan University under the guidance of Prof. Sang-Won Lee. The GreedyFTL is also a page-mapping FTL, but performs garbage collection if it runs out of free blocks. The victim block is chosen based on the “greedy” policy, i.e., the block which has the largest number of obsolete pages is selected as a victim during garbage collection.
What is the DummyFTL?
The DummyFTL has been added to the Jasmine firmware version 1.0.1. In fact, this is not a real FTL as it does not access NAND flash memory at all. The DummyFTL neither stores nor retrives any data. The main purpose of the DummyFTL is to simply measure the SATA and DRAM speed.
Which toolchain should I use to compile the firmware?
Currently, the Jasmine source code distribution supports two toolchains: ARM RVDS (RealView Development Suite) toolchain and Sourcery G++ toolchain. The ARM RVDS toolchain is a complete, end-to-end solution for software development supporting all ARM processors. It is officially provided by ARM Ltd., but it is not free. You can download the evaluation version of the latest ARM RVDS 4.1 Professional by registering to the ARM homepage. The evaluation version can be used for 30 days for any non-commercial use.
Another option is to use the Sourcery G++ Lite Edition available from CodeSourcery. The Sourcery G++ Lite Edition is a free, unsupported command-line version of Sourcery G++ based on the GNU C and C++ toolchain. Use the latest Sourcery G++ Lite 2011.03-42 for ARM EABI.
How can I build the Jasmine firmware using the ARM RVDS toolchain?
Install the ARM RVDS toolchain first. The Jasmine firmware has been built and tested with the RVDS version 3.1 and version 4.1. If you would like to build the TutorialFTL, perform the following command:
$ cd build_rvds
$ build_fw.bat tutorial
If you want to build the GreedyFTL, specify greedy instead of tutorial when you execute build_fw.bat as follows:
$ cd build_rvds
$ build_fw.bat greedy
When the build process is finished, you will see the firmware.bin file created, which is the binary image of the firmware.
How can I build the Jasmine firmware using the Sourcery G++ toolchain?
Install the Sourcery G++ toolchain. The Jasmine firmware has been built and tested with the Sourcery G++ Lite 2010.09-51 for ARM EABI. To build the TutorialFTL, simply perform the following command:
$ cd build_gnu
$ cs-make
By default, Makefile is configured to build the TutorialFTL. If you want to build the GreedyFTL, modify the first line of Makefile as follows:
FTL = greedy
And then, run the cs-make command. You can remove all the temporary files except for source files using the following command:
$ cs-make clean
When the build process is finished, you will see the firmware.bin file created, which is the binary image of the firmware.
How can I download a new firmware to the Jasmine board?
Boot your Jasmine board in the factory mode and run the installer install.exe. First, choose the menu #1 (“initialize”), and then menu #2 (“read scan list from flash block 0”). Finally, select the menu #3 (“install FW”). In the final step, the binary image of the firmware (firmware.bin) and the scan list are written to the block 0 of NAND flash memory. Note that the firmware binary file to be installed should be located in the current directory with the name “firmware.bin”. Turn off the Jasmine board if the installation process is completed without any problem. Set the jumper J2 into the normal mode position, and restart your computer.
Can I use a Linux machine to build the Jasmine firmware?
Although we haven’t tested, there will be no problem in building the firmware itself on Linux as the Sourcery G++ toolchain is also available for Linux. But the main problem is that the installer works only on Microsoft Windows platforms (XP, Vista, and 7). Porting the installer to the Linux platform should not be difficult, and if you are interested in this please let us know.
How can I debug my firmware?
There are two ways to debug your code. One is to use the ARM RVDS toolchain along with the RealView In-Circuit Emulator (ICE). This provides the most convenient and effective development environment. For further details, see ARM RVDS manuals. If you cannot afford it, there is still a poor man’s way: by printing debugging messages via the UART (Universal Asynchronous Receiver/Transmitter) port. The Jasmine distribution package includes a serial cable. Attach one side of this serial cable to the Jasmine board (connector P1) and the other side to the serial port of your development PC. The serial communication paramaters should be set as follows:
Baud rate: 115200 bps
Data bits: 8 bits
Parity: No parity
Stop bits: 1 bit
Hardware flow control: Yes
Also make sure whether the relevant on-board switches are set up correctly. To use the UART port, the on-board switches SW2, SW3, and SW4 should be configured as follows:
No. 1, 2, 3, 4 of the switch SW2: ON
No. 1, 2, 3, 4 of the switch SW3: OFF
No. 1, 2, 3, 4 of the switch SW4: OFF
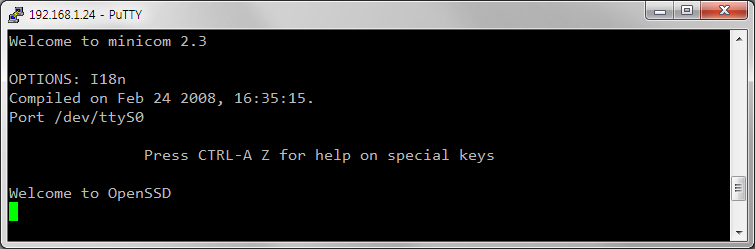
In order to print any debugging message in your firmware, you have to set OPTION_UART_DEBUG to 1 in .\include\jasmine.h before you rebuild the firmware. Once you enable the UART port, any arbitrary string can be sent using the function uart_print() available in .\target_spw\uart.c. If the UART debugging option is enabled, the Jasmine board will greet you when it boots as follows:
Miscellaneous
By the way, why the name Jasmine?
Recently, the Jasmine revolution is spreading throughout the world. The first OpenSSD platfrom based on the Indilinx’s BarefoootTM controller has been named “Jasmine”, hoping to initiate another revolution in the research and education on the latest SSD (Solid State Drive) technology. This name was originally suggested by Mr. Bumsoo Kim, CEO and President of Indilinx.